
Microsoft publishes updates regularly to address security issues and add new features and stability to the Windows operating system. However, not all updates install easily on your system and generate an error number. For example, many customers have expressed frustration with the 0x80073712 update error number, indicating that some files are missing from the system. Don’t be concerned if you receive the same update error number and cannot install the latest Windows update. We will list all of the possible fixes for the 0x80073712 error code.
How To Fix Guide On Windows Update Error Code 0x80073712?
Use Windows Troubleshooter
Before diving into substantial fixes, use Windows 10 and 11’s built-in troubleshooter. It attempts to identify and resolve any existing problems with Windows Update. Rep to the preceding steps.
1 – To open the settings app, press Win + I.
2 – Go to the System > Troubleshoot section.
3 – Select the Other Troubleshooter option.
4 – From the list, select the Windows Update troubleshooter option.
5 – Click the Run button to start the troubleshooter.
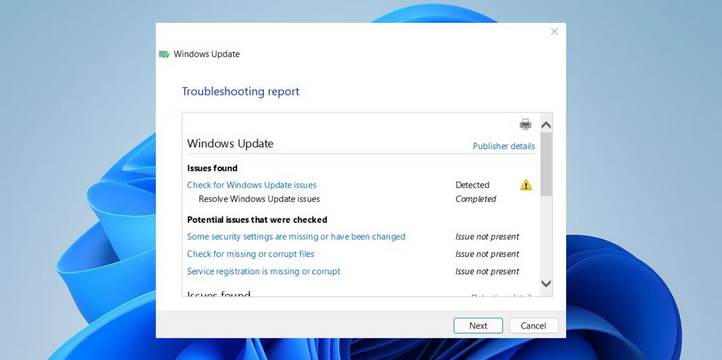
6 – Let the Windows Update troubleshooter discover any problems. Click the Next button.
7 – Exit the troubleshooter window and reattempt the Windows update installation.
Perform Complete System Shutdown
The quick startup option is enabled by default in Windows OS. Even if you restart or shut down your system, hibernate keeps the system state. To close and restart all background services, you must perform a complete system shutdown and then power it back on. Here’s how to perform a full system shutdown.
1 – Press Win + X to open the Power user menu. Scroll down the list and choose the Terminal (Admin) option.
2 – The Terminal app will open with a command prompt with administrative privileges.
3 – Type shutdown /s /f /t 0 command and press the enter key.
4 – Your system will be powered off. Therefore, it will take longer than a standard shutdown operation.
5 – Restart your Windows computer and attempt to install the update.
Restart Windows Update Services
Windows Update employs a slew of background services to acquire and download updates. You’ll get an 0x80073712 error if these services aren’t operating automatically. Windows Update Service, Cryptographic Services, Windows Installer Service, and Background Intelligent Transfer Service are among them. To start the required services, repeat the steps below.
1 – Open the Run dialog box by pressing Win + R. Press Enter after typing services.msc.
2 – Your system’s Services utility will open. Now, in the list, find the Background Intelligent Transfer service.
3 – To open the properties window, double-click on the BITS service. Select Automatic as the Startup Type and click the Apply button.
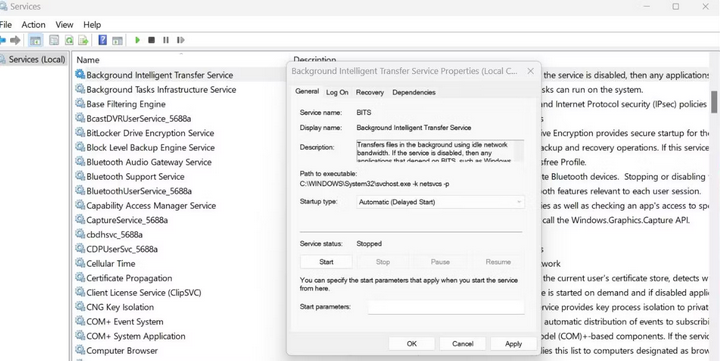
4 – To close the Properties windows, click the OK button. Next, right-click the service and choose the Start option from the context menu.
5 – Similarly, set all services to automatic and start them manually.
6 – Reattempt the Windows update by closing the Services window.
Run Disk Cleanup Tool
Disk Cleanup can delete delivery optimization files, obsolete Windows update files, and the Temp folder. If the files in these places become damaged, they might interfere with the routine updating process. Here’s how to use Windows disk cleaning.
1 – Press Win + S to launch the search utility in Windows.
2 – Open the Disk Cleanup tool by typing cleanmgr.exe and pressing the enter key.
3 – By default, it chooses the system drive (C). To proceed, click the OK button.
4 – Check the boxes next to the files you want the tool to clean up. Then, click the Clean up system files button under the System Files tab.
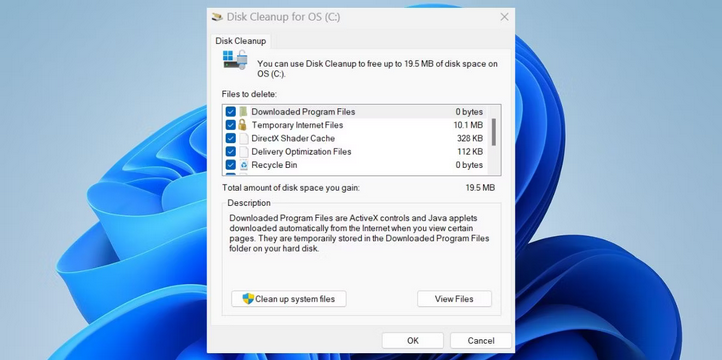
5 – Disk Cleanup will close and redirect you to the proper drive selection. Press the OK button.
6 – Select the Delete files button.
Rename SoftwareDistribution Folder
The content of Windows updates is saved in the SoftwareDistribution folder. You must not delete it because it is housed in the Windows folder on the C drive. You can instead rename the folder to compel the update service to regenerate it. Rep to the preceding steps.
1 – Go to the Start menu and type CMD. To open the command prompt with administrative privileges, press Ctrl + Shift + Enter.
2 – Execute the following commands to terminate any Windows update-related services.
net stop wuauserv net stop cryptSvc net stop bits net stop msiserver
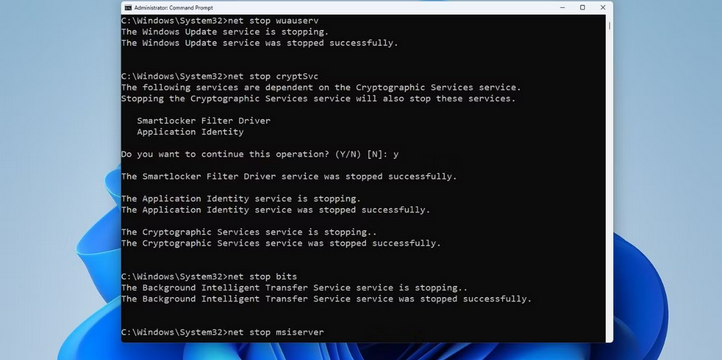
3 – Once these services are stopped, open a command prompt window and type cls. Then enter the commands shown below.
ren C:\\Windows\\SoftwareDistribution SoftwareDistribution.old ren C:\\Windows\\System32\\catroot2 Catroot2.old
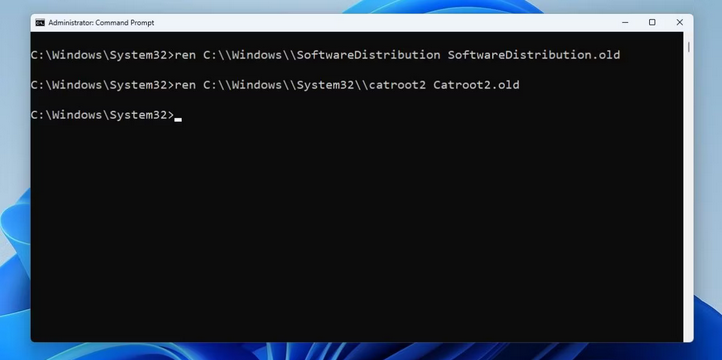
4 – Both of the above commands rename the SoftwareDistribution and Catroot2 folders.
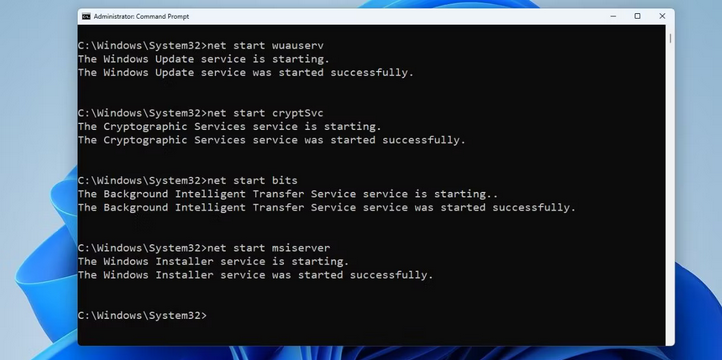
5 – Restart all the Windows services you disabled in Step 3. Enter the commands listed below.
net start wuauserv net start cryptSvc net start bits net start msiserver
6 – Visit the following folder location after restarting your system: C:\Windows. You’ll see a new SoftwareDistribution folder in that place.
7 – Go to Settings > Windows Update and try to download and install updates.
Delete Pending.xml File
All pending Windows update tasks are listed in the pending.xml file. Unfortunately, it frequently interferes with installing new updates since several unfinished previous update tasks exist. As a result, you must delete this file before proceeding with the Windows update. Retrace the steps below to delete the pending.xml file.
1 – Create an administrator account. Then, to open the file explorer, press Win + E.
2 – Locate the C:\Windows\WinSxS folder.
3 – Right-click on the pending.xml file in the WinSxS folder.
4 – Hold down the Shift key while clicking the Delete option.
5 – Restart the computer.
Manually Download Windows Updates
Consider a direct download and install strategy if you cannot download a certain Windows update through the Settings page. Then, search for the KB update you wish to download on the Microsoft Update Catalog page. First, however, you must determine which update number fails to download and install on your system.

Reset Windows
If none of the above procedures work to fix 0x80073712, you must resort to resetting Windows. However, before attempting to perform a Windows system reset, try standard fixes on your system, such as SFC, CHKDSK, and DISM checks. Also, deactivate Windows Defender before pressing the reset button and try updating your system.
Conclusion: 0x80073712
Windows updates might be difficult to install at times. To find and resolve problems, use the built-in troubleshooter. Following that, restart all critical Windows update services and execute the Disk Cleanup tool. Finally, consider doing a manual update or a Windows Reset if everything else fails.