If you possess a Computer with an NVIDIA GPU, GeForce Experience is a valuable app that may help you improve your games. Unfortunately, some users cannot use GeForce Experience due to an error with the code “0x0001,” accompanied by the message “Something went wrong.” You won’t be able to run your GeForce Experience if it has the 0x0001 error code. As a result, here is how error code 0x0001 may be fixed for GeForce Experience on Windows 10 and 11.
How To Fix Quickly GeForce Experience Error Code 0x0001 In Windows?
Check If All Required NVIDIA Services Are Enabled And Running
When certain NVIDIA services necessary for GeForce Experience are not enabled and operating, the 0x0001 error code may display. There are various NVIDIA services to check, so here’s how.
1 – Press Win + S to access the search box.
2 – Type Services into the file and app search bar.
3 – Click the Services app the search tool finds.
4 – Next, double-click the NVIDIA Display Container LS service.

5 – Select Automatic from the Startup Type selection if NVIDIA Display Container LS service is not running.
6 – To run the NVIDIA Display Container LS service, click the Start button.
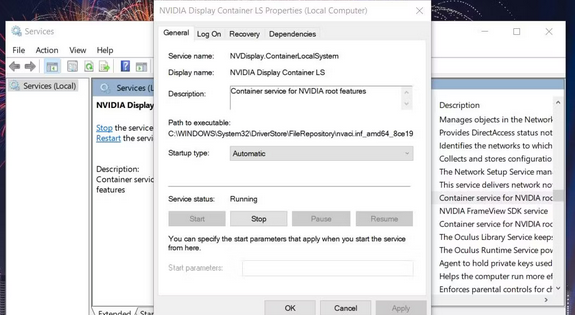
7 – Click OK after pressing the Apply button in the properties window.
8 – For the NVIDIA Telemetry Container and NVIDIA LocalSystem Container services, repeat steps 5–7.
If you can locate them, check and start the NVIDIA NetworkService Container, GeForce Experience Service, & GeForce Experience Backend Service. Nevertheless, set the starting options for those services as follows.
- NVIDIA Geforce Experience Backend – Automatic (Delayed Start).
- NVIDIA GeForce Experience – Automatic (Delayed Start).
- NVIDIA NetworkService Container – Manual.
If all of those NVIDIA services are already running, you can restart them. First, right-click an NVIDIA service and choose Stop. Then, right-click it again to choose its Start option.
Interact With The Desktop Using NVIDIA Container Services
Several GeForce Experience desktop users have confirmed that enabling NVIDIA container services to interact with the desktop will resolve error code 0x0001. For NVIDIA services, those users chose Allow service to interact with a desktop option. On Windows 11/10, you may select that option in the following manner.
1 – Launch Services as directed in steps one through three above.
2 – In the Services pane, double-click the NVIDIA Display Container.
3 – Choose the Log On tab.
4 – If the Local System Account option isn’t already selected, click it.
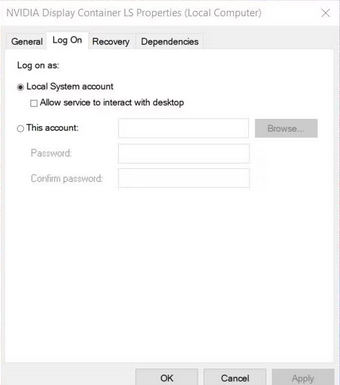
5 – Choose the Allow service to interact with the desktop checkbox.
6 – To set the new log-on option, click Apply > OK.
7 – For the NVIDIA Telemetry Container, NVIDIA NetworkService Container, and NVIDIA LocalSystem Container services, repeat steps two through six.
Edit CurrentVersion Key In The Windows Registry
A registry anomaly can generate an error code 0x0001 for the CurrentVersion key. Users could resolve the issue by adding missing backslashes to the data values for a few strings in that key. You may app this potential solution by following the steps below.
1 – Locate Registry Editor by opening the Windows search box and typing the regedit keyword.
2 – To open Regedit, click Registry Editor in the search results.
3 – Clear the existing registry location in Regedit’s address bar.
4 – Enter this address in the address box and hit Return to launch the CurrentVersion key.
Computer\HKEY_LOCAL_MACHINE\SOFTWARE\Microsoft\Windows\CurrentVersion5 – Double-click the string Program Files Dir.

6 – The right value for the ProgramFilesDir string is C:\Program Files. Well, if a backslash is missing in that data, enter C:\Program Files in the Value box.

7 – Click OK to set the new value.
8 – Double-click the ProgramFilesDir (x86) string.
9 – The value for this string should be set to C:\Program Files (x86). Click OK after adding a backslash if one is missing from the string value.

10 – After modifying the CurrentVersion registry key, restart Windows.
Reinstall GeForce Experience
Another possible reason for error code 0x0001 is corrupted GeForce Experience files. Reinstalling GeForce Experience will provide the app with a clean slate to work with, which may help you resolve this irritating error message. Here’s how to reinstall GeForce Experience on a Windows 11/10 computer.
1 – Launch the uninstaller app from the Control Panel.
2 – Under Programs and Features, select GeForce Experience.
3 – Select the Uninstall/Change option.

4 – To uninstall GeForce Experience, choose to Uninstall in the confirmation dialogue.
5 – Open the download page for GeForce Experience.
6 – Click the Download Now button for GeForce Experience.
7 – Select the downloaded files tab in your browser and double-click the GeForce Experience setup file. In Chrome, Opera, Firefox, and Edge, the hotkey to open the Downloads tab is Ctrl + J.

8 – To reinstall the software, follow the GeForce Experience installation routine.
Update PC’s NVIDIA Graphics Driver
Well, update the driver to the most recent version of your NVIDIA graphics card’s driver is out of date. We suggest manually downloading the most recent driver for your GPU from the NVIDIA website.
Reinstall The NVIDIA Graphics Driver
If you do not need to update your graphics driver, try reinstalling the current one. The Display Driver Uninstaller software is used to remove an NVIDIA driver. Open the NVIDIA download page to acquire a new driver. Click the Search option after selecting your graphics card model and operating system version from the drop-down boxes. To obtain the most recent driver package for your GPU, click Download. Double-click the downloaded NVIDIA driver file to launch the installer and reinstall the driver.

Uninstall Active VPN Software
If you’re using VPN software, this might be creating a connection failure for GeForce Experience. So, before attempting to access the NVIDIA app again, consider removing the VPN. Uninstalling the VPN software through Program and Features, however, would most certainly alleviate GeForce Experience issues caused by it.
Conclusion:
Several NVIDIA GeForce Experience users who needed to fix the error code 0x0001 issue with Windows 11/10 found that the suggested remedies in this tutorial worked. Thus, one of them will also have that error code fixed on your System. The NVIDIA GeForce Experience app may then improve your games again.


