
The Windows Registry is a critical system component that should be left alone. However, the register becomes larger and older over time and may include many broken or corrupt items. Some registry entries may stay on your system even after you remove a program. Broken registry items can cause system errors and interfere with your system’s regular operation. But don’t be concerned! We will explain the significance of the Windows Registry and list some ways to fix the problem and avoid it in the future.
What Is Windows Registry?
The Windows Registry maintains the configuration settings required for a Windows system component or a program to run correctly. Tweaking aficionados can fiddle with registry entries and even create new ones to modify a program’s functionality. By modifying the registry settings, you may enable hidden Windows 11 themes. Modifying the Windows Registry and gaining access to new capabilities may sound thrilling. However, unless directed so by a trusted source, you must never edit, add, or delete any entries in it. You can only damage your computer significantly if you are careful while editing the Registry. The Windows Registry, on the other hand, is prone to errors. Malware infections, sudden power outages, and corrupt or out-of-date entries can all cause these errors.
How To Fix Quickly Broken Registry Items In Windows 11?
Use the procedures listed below to fix broken registry items on your Windows 11 system.
Use Disk Cleanup Tool
Try the Windows Disk Cleanup utility instead of installing a third-party cleanup tool. It is an ancient yet reliable utility that comes with every copy of Windows OS. It may be used to clean system junk and registry associations for some apps. Rep to the preceding steps.
1 – Press Win + R to open the Run command box. In the text input box, type cleanmgr and press the enter key.
2 – The Disk Cleanup tool will be launched. Click the OK button after selecting the C drive.
3 – Scroll to the bottom and click the Clean up system files button.
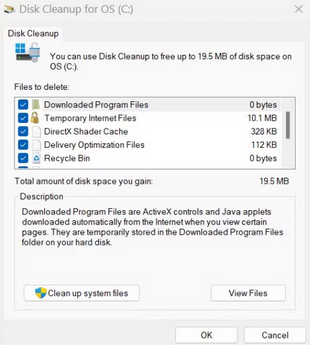
4 – The Disk Cleanup tool will be relaunched. Keep the OS (C:) drive selected and click the OK button.
5 – Let the utility scan the system. After that, click the OK button.
6 – Disk Cleanup will validate your selection once more. Select the files to be deleted and press the Delete button.
Try The Automatic Repair Tool
Microsoft provides an automated repair tool to fix system boot problems and core system registry files. This is how you use the tool.
1 – To sign out of Windows, press Win + L. In the bottom-right corner, click the power symbol.
2 – Press the Shift key, then click the Restart option.
3 – After a restart, Windows will take you to the Windows Recovery Options screen. Select Troubleshoot > Advanced options.
4 – Choose the Startup Repair option on the Advanced options screen.
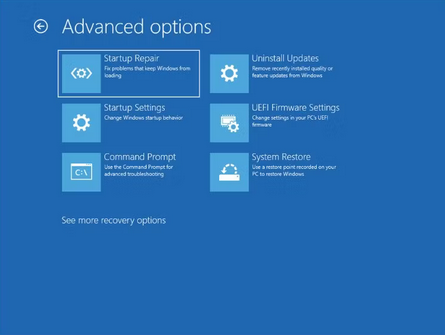
5 – The utility will begin diagnosing and attempting repairs on your system. After that, restart the system.
Run SFC Scan
SFC is an integrated utility that may scan your Windows system for corrupt or missing system files. It will then replace all corrupted or missing files with new copies. Here’s how to use SFC to scan your system.
1 – Press Win + R to open the Run command box. Next, enter cmd in the text input box and press Ctrl + Shift + Enter simultaneously.
2 – A command prompt window with administrator credentials will be launched.
3 – To execute the command, enter sfc /scannow and press enter.
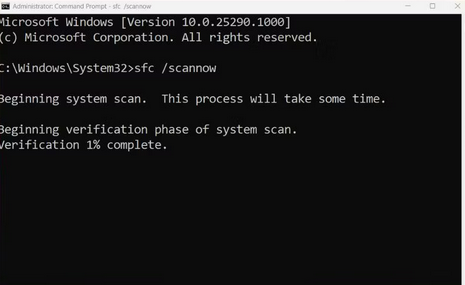
4 – Allow the utility to scan and replace files on your system while you wait.
5 – Restart your computer after closing the command prompt window.
Try DISM Scan
DISM is a command-line tool that scans and repairs Windows System Image files. The utility may be used both online and offline. To run a DISM scan, repeat the steps below.
1 – To open Windows search, press Win + S. In the right pane, search for CMD and choose the Run as administrator option.
2 – Once CMD has been launched with elevated access, execute the command DISM /Online /Cleanup-Image /RestoreHealth and press the enter key.
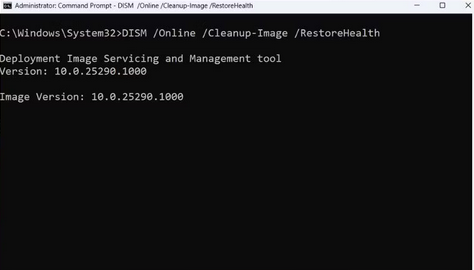
3 – Wait for the tools to scan and correct the system image faults.
4 – Exit the command prompt and restart your computer.
Import Old Registry Backup
If you regularly make registry backups on Windows, you can resolve the broken registry entries issue with your system. You can import the previous registry backup from when the system functions properly when you run into problems. Here’s how to import an older backup into the Windows Registry.
1 – To launch the Run dialog box, press Win + R. Then, in the text box, type regedit and press the Enter key to open the registry editor.
2 – In the Registry Editor window, navigate to the top bar and click File > Import.
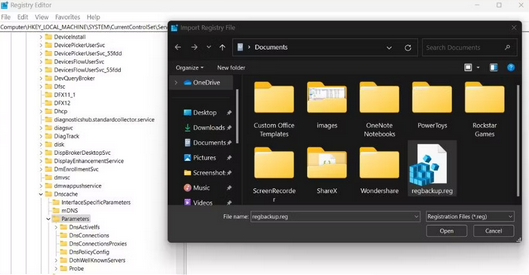
3 – Go to your system’s registry backup file location. Please select it and click the Open button to import the registry file.
4 – Wait a few minutes for the import to finish. Start your system again.
Check For Malware On System
Malware may create and modify registry items and break or corrupt existing ones. Therefore, using Windows Defender to scan your Windows PC fully would be best. Here’s how to run a full system scan using Windows Defender.
1 – Go to the Start menu and type Windows Security into the search bar.
2 – To open the app, click the correct search result.
3 – Select Virus and threat protection > Scan options from the menu.
4 – Click the Scan Now button after selecting the Full Scan radio button.
5 – Windows Security will execute a full disk scan of all the files. If it detects any malware, manually delete it from your system.
Do System Restore
The System Restore tool saves all Windows system files and drivers, including registry contents. If none of the previous techniques work, you can use a restore point to revert to the last known good system configuration. To perform a system restore, repeat the steps below.
1 – Press Win + R to open the Run command box. Enter rstrui into the text box and press Enter.
2 – On your system, the System Restore utility will launch. To proceed, click the Next button.
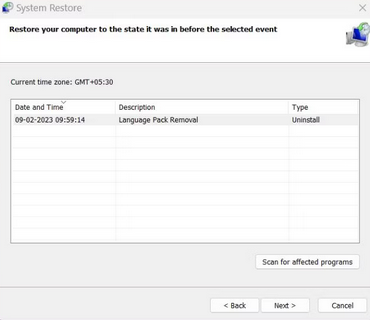
3 – All available restore points made by program installs or Windows updates will appear.
4 – Choose the most recent restore point from the list, then click the Scan for affected programs button. Because you’ll have to reinstall these programs, note them or snap a screenshot.
5 – Click the Close button. To proceed, click the Next button in the System Restore box.
6 – Click the Finish button to confirm your restore point selection.
7 – To apply the restore point, your system will restart automatically. It will then boot to the desktop automatically.
Reset PC
If System Restore does not work, the final arrow in your troubleshooting quiver is to perform a Windows factory reset. The system will be reverted to a clean state, and all drivers and programs will be removed. However, if you select the Keep my files option while resetting your Windows 11 PC, you may save your files and documents.
Conclusion: Broken Registry Items
Well, if your Windows Registry has seen better days, begin by executing disk cleanup and SFC and DISM scans. After that, scan your system for malware and import an old registry backup. (if you have one). Finally, use the system restore utility or restart your Windows PC.