
The feature error 0x80370102 happens when users attempt to install and run a Linux distribution using the ‘Windows Subsystem for Linux’ error. The error is frequently caused when users attempt to install both Linux and Debian distros and is typically due to problems with the hardware Virtualization feature in BIOS. We look at the reasons for this issue and the troubleshooting procedures to help you quickly resolve the problem.
Error 0x80370102 Causes
Many variables, particularly hardware issues, may have caused the error. This is a list of the most typical causes of this issue.
Hyper-V And Other Relevant Settings Are Disabled – Hyper-V, Microsoft’s hardware virtualization tool, enables you to construct and run virtual machines. For you to be able to install and run distros, this service, as well as other essential services such as the Virtualization option, must be enabled in the BIOS.
You’re Using Windows Insider Preview Build – If you’re not using a fully developed version of Windows, you’re also more likely to run across errors like the one at hand.
Lxssmanager.exe Service Is Corrupt – The Lxssmanager.exe service oversees the launch of new WSL instances. It is corrupt. If this service is corrupt or otherwise malfunctioning, you won’t be able to install a Linux distribution to use with Windows Subsystem for Linux 2.
Now that we know what’s causing this problem let’s look at some options that will hopefully fix it for good. But before we start, we recommend double-checking that your computer supports hardware virtualization. Also, if you are running an Insider Build of Windows, consider installing a stable Windows version, as a version under development is prone to errors like this one.
Enable Hyper-V
Ensuring all necessary services, including Hyper-V and Virtualization, are enabled is the first thing we recommend doing. Using the Control Panel, we will enable the Hyper-V feature in this approach. We will also use the Task Manager utility to check if the Virtualization feature is operational. Here’s how to enable Hyper-V on your computer.
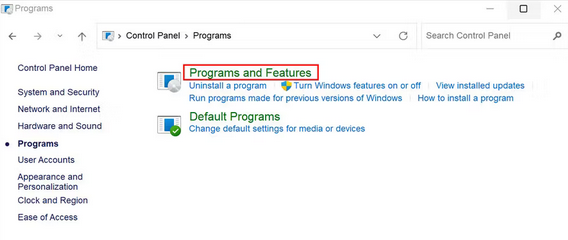
1 – Press the Win + R keys together to open a Run dialogue.
2 – Select the Programs option, then click Program and Features.
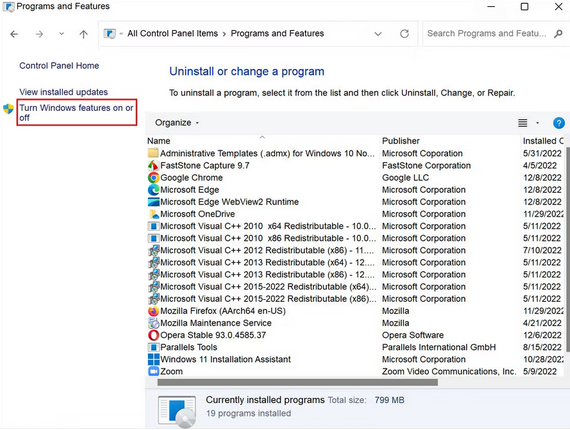
3 – Click Turn Windows Feature On or Off on the left pane.
4 – In the ensuing dialogue, check the box associated with Hyper-V and click OK.
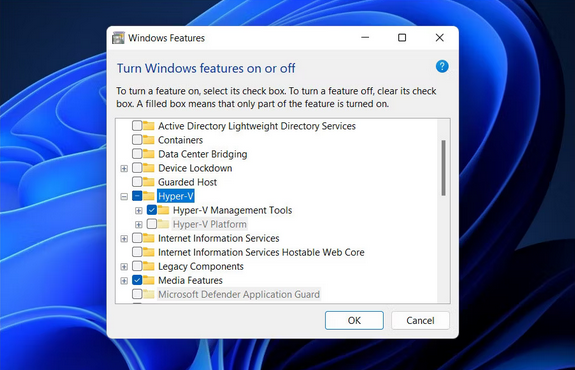
5 – After completing, restart your computer and check whether the issue has been repaired. While you’re about it, we recommend checking to see if the Virtual Machine Platform feature is enabled by doing the same steps. If it is disabled, enabling it should aid you in fixing the issue as well.
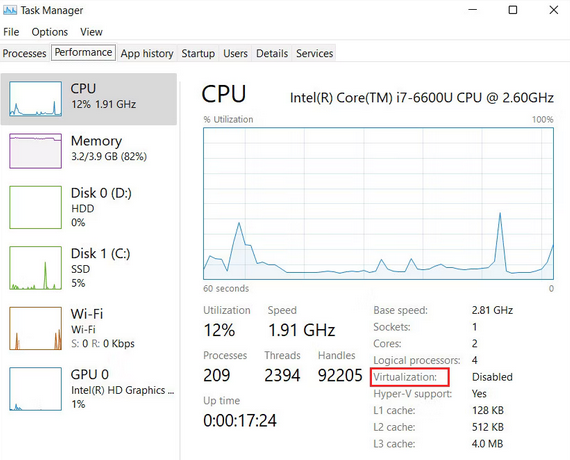
We’ll check to see whether Virtualization is enabled on the device next. In most devices, it is disabled by default. To proceed, follow the steps below.
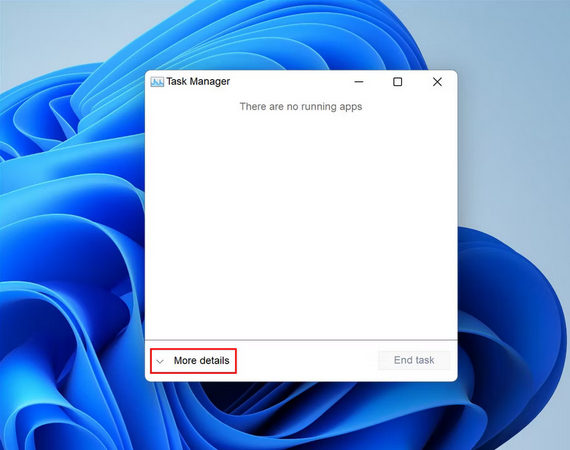
1 – Press the Ctrl + Shift + Esc keys together to open Task Manager.
2 – Click the More information icon to enlarge the Task Manager window.
3 – Go to the Performance tab and click CPU.
4 – Check the state of Virtualization under the CPU graph on the right side. If you need clarification on whether your computer supports Virtualization, look at the Hyper-V support section in the same window. If it reads Yes, it means you may take advantage of hardware virtualization on your computer.
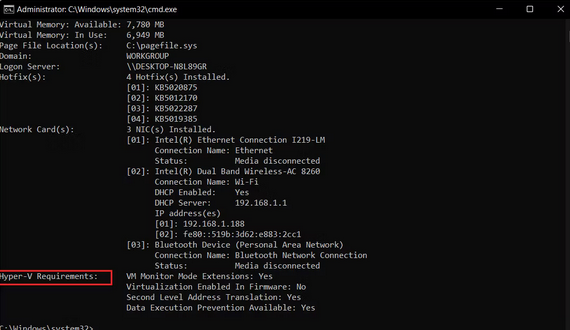
5 – Instead, simultaneously press the Win + R keys to open Run.
6 – To open Command Prompt as administrator, type cmd in the text area and press Ctrl + Shift + Enter.
7 – In the User Account Control Prompt, click Yes.
8 – On the Command Prompt, type systeminfo and then press Enter.
9 – Wait for the command to execute before proceeding to the Hyper-V requirements section. If Virtualization is enabled, you should be able to view it there.
Well, if the service is disabled, enabling Hyper-V technology on Windows should fix the 0x80370102 problem.
Restart LxssManager Service
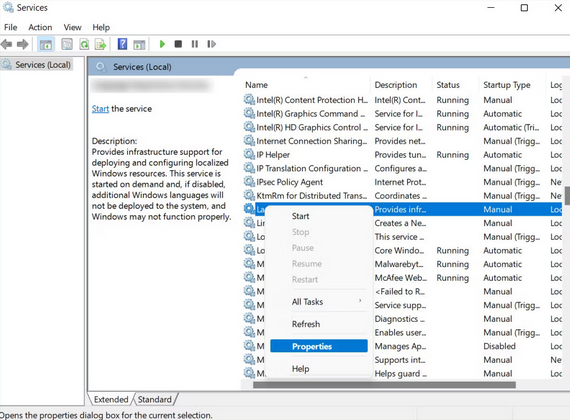
As previously stated, the Lxss Manager service must be operational to install and run the Linux distribution. Therefore, the simplest method to fix a malfunctioning service is to restart it. The Windows Services utility will be used in this technique to make these modifications.
1 – Press the Win + R keys together to open a Run dialogue.
2 – Click OK after typing services.msc into Run.
3 – In the ensuing window, locate the Lxss Manager service and right-click on it.
4 – Select Properties from the context menu.
5 – Click the Stop button, wait a few seconds, and then click the Start button.
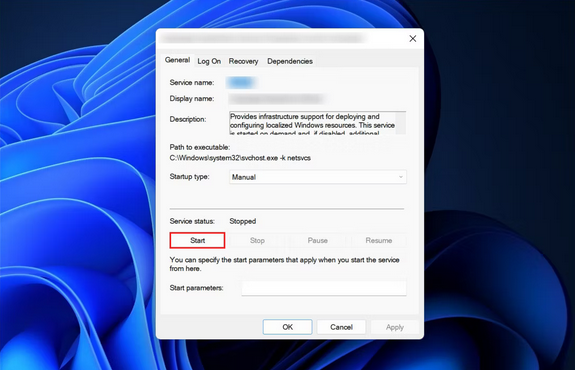
6 – After restarting the service, check if the issue has been fixed.
Enable Nested Virtualization & Change RAM Settings
Another 0x80370102 fix that worked for customers was enabling Nested Virtualization, a feature that allows you to run Hyper-V within a Hyper-V virtual machine. If this feature is disabled on your computer, enabling it should resolve the problem.
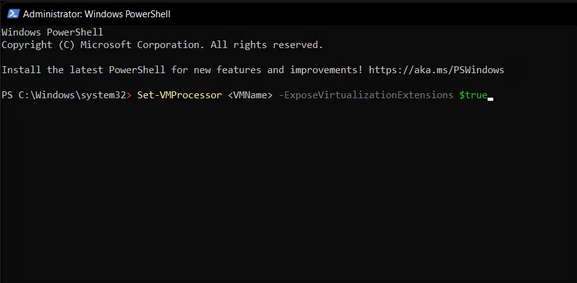
1 – In the Windows search field, type Powershell and click Run as administrator.
2 – In the User Account Control window, click Yes.
3 – In the Powershell window, type the following command and click Enter to execute it.
Set-VMProcessor <VMName> -ExposeVirtualizationExtensions $true
4 – Launch the Hyper-V manager and right-click the virtual machine.
5 – Select Settings from the context menu.
6 – On the left pane, click Memory.
7 – Double the Startup RAM number and uncheck the Enable Dynamic Memory box.
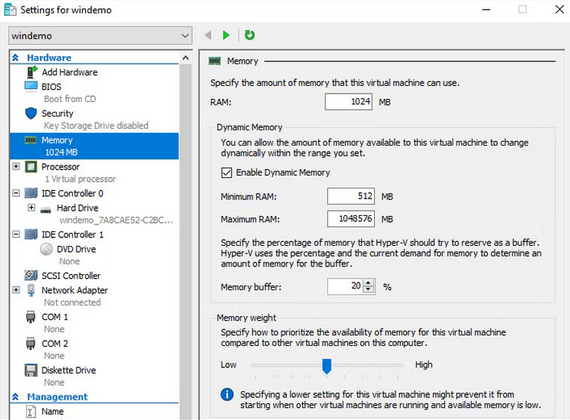
8 – To save the changes, click Apply > OK.
9 – Right-click on your virtual machine once more and choose Connect.
10 – Let the system restart before installing or running Ubuntu again.
Conclusion: 0x80370102
Accessing the Windows Subsystem for Linux is straightforward; however, there are situations when you may run into installation or functional errors. The procedures outlined above should assist you in effectively fixing the WslRegisterDistribution error. If the error returns, you may contact Microsoft support to determine the root cause of the problem in your case and execute a suitable remedy.